
The
UVEX
Project
UltraViolet EXplorer spectrograph
A spectrograph based on the Cerzny-Turner design

By Christian Buil, Pierre Dubreuil, Stéphane Ubaud, Jean-Luc Martin,
Alain Lopez, Pierre Thierry
A ARAS project
Last version: October 24, 2020


1. INTRODUCTION
UVEX is a spectrograph mainly intended for astronomical observations on relatively small sized telescopes (see detailed specifications below). Its special property is that you can manufacture it yourself, thanks to the 3D printing technology, although if you choose to build it yourself then you must also mount and adjust from scratch. The UVEX project in its current form is therefore intended for DIYers, those who want to understand the inner workings of an optical instrument, and teachers who want to offer their students a very rich, complete and motivating educational project. Constructing and using UVEX is relevant to a number of subjects as you shift from planning to use, with the help of various physical phenomena (potentially supporting courses in physics, biology, chemistry...) and even astrophysical phenomena if the instrument is put at the end of a telescope!
You should be aware of the (moderate) risk of not reaching the end of such an adventure. And if your aspiration is rather to have a perfectly finished instrument that is immediately operational, it is better to turn to the wide ranging and high quality commercial offerings now available.
The project is presented here royalty-free for non-commercial use. Our goal is that you can complete the instrument, so here we provide information you will need for that purpose.
To make things easier for you, we have created a very detailed website, with tutorials, videos,… and even a UVEX spectral database that you can consult freely: see http://spectro-uvex.tech. Essential !
UVEX is a serious instrument, with which it is possible to carry out works of real scientific value. It is based on a simple configuration (essentially consisting of two mirrors) which gives it a good optical luminosity and a very wide spectral coverage, ranging from ultraviolet to infrared (depending on the camera used). UVEX allows you to realize spectra of the visible part of the electromagnetic spectrum, but it is also worth emphasising its high efficiency in the ultraviolet, a domain almost unexplored by amateur astronomers today, and which will also interest professionals researchers. It is this feature that gives the name of UVEX, the acronym for UltraViolet EXplorer.
Here is the characteristic look of a star spectrum obtained with UVEX in the so-called "basic" configuration of the instrument (by using a 300 lines/mm grating - the instrument is optically optimized for this grating - which is interchangeable with some limitations):

This is the spectrum of the bright star Deneb obtained by mounting UVEX at the focus of a Celestron 8 telescope. Below is a detail of the violet and blue part of this spectrum showing that the detail is preserved in this area, a unusual feature in an amateur spectrographs:

But the ability to explore the infrared part of the spectrum is not forgotten, as evidenced by the two spectra of stars presented below (UVEX becomes an IREX!):

In a nutshell, UVEX is a low to medium resolution spectrograph. The resolving power R can range from R = 500 to 3500 depending on the slit width employed and the selected grating (from 300 lines/mm to 1800 lines/mm, the latter only usable for the blue part of the spectrum). As noted, both the input slit (typical width between 14 and 35 microns) and the grating are interchangeable.
UVEX is designed for use on relatively small and relatively slow telescopes. The typical instrument is a Schmidt-Cassegrain, Maksutov or Ritchey-Christian telescope of 150 to 280 mm in diameter with an aperture ratio of between F / 8 and F / 10. This is an important remark and a limitation that you must absolutely consider. If your telescope is open at F/5 (a Newton for example), UVEX is not really adapted: you will obtain a spectrum but it will be degraded (loss of resolution of 30% compared to F/10 input beam for a 25 microns slit and exploitable spectral domain reduced). An aperture at F/6 is in practice the brightest configuration usable with UVEX. Similarly, the use of a large diameter (500 mm and more) will require the use of a wide slit that automatically degrades spectral resolution performance.

The table below shows the resolving power (R) achieved at 650 nm for a telescope at F/10 and for various technical combinations offered by UVEX:

Opposite, the appearance of the solar ultraviolet spectrum according to the adopted configuration. UVEX is here mounted at the focus of a 10-inch F/8 Ritchey-Chrétien telescope that is pointed to a blue daytime sky.


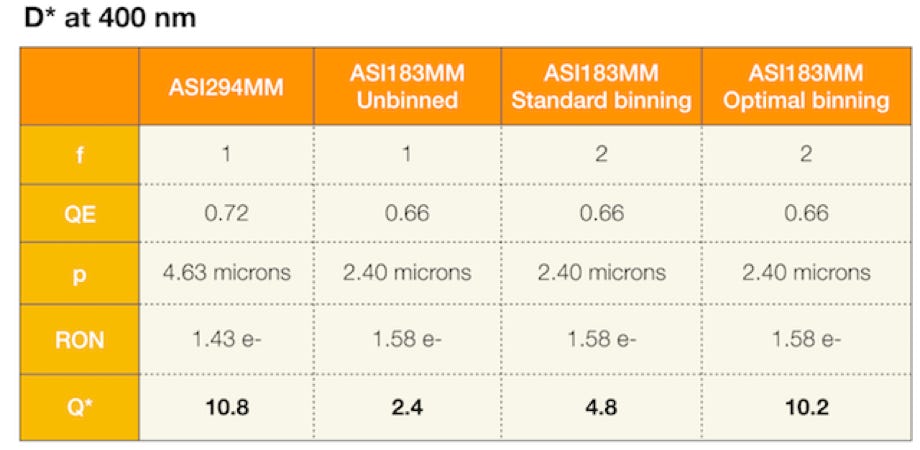
UVEX has a removable camera interface. The currently designed interfaces are for ATIK cooled cameras (see the photograph opposite) and ZWO cameras (also the cooled models). For example, this spectrograph is very comfortable with a CCD camera ATIK 414EX or ATIK 460EX, or in CMOS with a camera ASI183MM pro. An interface for ATIK314L camera is also available (see section 3).
The linear dimension of the spectrum usable in the plane of the detector is of the order of 13mm with a grating of 300 lines/mm and a telescope at f/10 (this would mean taking a spectral range of a little more than 4000 angstroms at one time with ASI183MM camera, for example).
A pointing/guidance device in front of the spectrograph is essential for astronomical spectrography. UVEX is compatible with the guiding cube designed for the Alpy 600 spectrograph from Shelyak Instruments. A 3D printed version of this device is also being designed in the context of the UVEX project.
For the most up-to-date information on the UVEX project, it is highly recommended to register on the ARAS forum, and to consult the section especially dedicated to the project (in addition to all the other exciting topics described in this forum, which are all invitations to observe with a spectrograph, whatever it is). We suggest you make your comments and questions on this forum.

Part of the UVEX team (summer 2018), surrounding Christian Buil: Stéphane Ubaud, Pierre Dubreuil, Alain Lopez and Jean-Luc Martin. We must also add Pierre Thierry, who participated in the development of the very first UVEX prototype:
At left, the UVEX(1) prototype (september 2016).

2. THE OPTICAL FORMULA
UVEX is a spectrograph based on a relatively simple and well known Czerny-Turner design. The right figure shows the optical formula in its basic form. There are two spherical concave mirrors (M1, M2), a diffraction grating (R) to spectrally disperse the light, an input slit (F), and of course, a camera (D) to record the spectrum.
In the particular case of UVEX, a cylindrical lens is added just in front of the detector to correct the astigmatism inherent in this optical formula (a cylindrical lens has a finite CURVATURE radius on an axis and an infinite curvature radius on the other axis). The special feature of UVEX is that the design uses almost entirely mirrors, hence its property of achromatism (the absence of chromatic aberration), which allows us to observe a very wide range of wavelengths without refocusing. To preserve this achromatism, it is absolutely vital to avoid using UVEX on a telescope equipped with a focal length reducer or a field corrector. The best place is always at the direct focus of a mirror telescope (the SCT entrance corrector plate is tolerated, but absorb some UV).
More specifically, UVEX is a “crossed” Czerny-Turner spectrograph (see right figure) to facilitate the physical design (interface with the telescope and camera, compactness). As indicated above, a cylindrical lens is added, facing the detector. Its purpose is to correct the very strong astigmatism which the Czerny-Turner suffers. Without this lens, the trace of the spectrum of the stars would be excessively wide along the spatial axis, which would greatly affect the efficiency of the instrument when observing low-brightness stars. This lens has no effect along the spectral axis (in that dimension it behaves like a simple parallel glass plate, without optical power) while along the perpendicular axis (spatial) it has a focusing effect. In the final version of UVEX (so-called Version 3), the lens is also strongly inclined relative to the average axis of the ray beam. This design standardizes the correction of astigmatism along the spectrum - this inclination corrects the clean chromaticism of the cylindrical lens. It is made of BK7, a very transparent optical glass in the ultraviolet.

All optical elements are available from ThorLabs. The references for the order are indicated on the optical opposite drawing. Note that spherical concave mirrors are used in dedicated mounts (brackets), which are available from ThorLab. The focal length of the mirrors is 100 mm, with a diameter of 25 mm. The dimension of the cylindrical lens is 22 mmm x 20 mm.
The catalogue number in the figure is for a grating with 300 lines/mm blazed at 500 nm. The size is 25 mm x 25 mm x 6 mm. The ThorLabs catalogue has gratings with different line densities (the maximum density usable on UVEX is 1800 lines/mm). For example, the grating of 1200l/mm blazed at 500 nm is GR25-1205, while the one blazed at 400 nm (special UV) is GR25-1204.
The slits used are those provided for the Shelyak Alpy 600 spectrograph (either printed on glass or clear slit version).

The detail of the optical scheme is given in the figures below (note: the orientation of the grating indicated corresponds to an etching density of 300 lines / mm, with the wavelength 510 nm positioned in the center of the detector):


And the following diagrams give the dimensions for the camera interfaces (for ATIK and ZWO):


Remember, since the optical elements are mostly mirrors, UVEX is not affected by chromatic aberration, the spectral range potentially covered is therefore very wide, with no need to adjust image. For example, on the ultraviolet side, the wavelength limit is the spectral cutoff induced by the Earth's atmosphere (the ozone layer at high altitude), as shown in the figure below:

It would be necessary to go into space to do better! Another characteristic of UVEX is the high optical efficiency, which reaches 35% in the green (excluding the losses at the slit related to the enlargement of the star image because of seeing) - see the detail in the following figure:

This 35% value is a particularly high photon efficiency for a spectrograph (the final result depends on the intrinsic quantum efficiency of the detector and the wavelength). This result comes from the relatively simple optical scheme. This is a conscious design choice, which has the tradeoff of an increase in the difficulty of adjustment compared to a more traditional spectrograph, as we will see later.
3. REALISATION
A view of all the mechanical parts constituting the UVEX spectrograph:

Files needed for 3D printing in STL format can be downloaded from the links below. The name of the nomenclature is also indicated:
It is important to be careful about choosing the material for printing. PET-G was selected for the realization of the first versions of UVEX. But it is essential to choose a material that is very opaque to light. Often the pieces look opaque to the eye, but this is not the case in the infrared.
PET-G reinforced with carbon fibres (at 20%) is a better option in terms of rigidity and opacity, but your printer must be able to use this type of wire (choice of nozzles, adjustments, etc.).
The lest image shows a plate made of material that is transparent to light in the deep red (it is lit from behind with a powerful lamp). It is almost impossible to operate an astronomical spectrograph if the structure that constitutes it is not lightproof. This is a critically important point.


If the light-tightness of the housing is still insufficient, resign yourself to covering the body of the spectrograph with one or more black cloth(s), as in the photograph below:


Experiment with the materials that suit you best, and with the slicer settings of your choice too. This is an area where everyone's experience and mastery of their own equipment matters most. Note in the next image the arrangement of reinforcements needed around the mounting holes of the two mirrors and the grating.
It takes about 10 hours to print the main box with a 20% density.
A 3D printed object is built layer by layer, each layer being deposited on the previous one. For some parts of the pieces, this "previous layer" simply does not exist, and it is therefore not possible to build the following layers in the air. Temporary support must be defined by the slicer software in these situations, which can be removed once the printing is complete. Some software automatically positions the support for you and makes suggestions. Opposite, the UVEX box with supports voluntarily added at the level of the openings, for example.

The following views show the positioning of the parts on the printer bed. All are made with a 0.2 mm layer fineness, except for the clear slit holder UV06, made with an accuracy of 0.15 mm. If you use this piece, be careful to print it with the angled surface that receives the metal slit on the printer bed (this is the only way to have a very smooth surface). It is recommended to print the case with 3 perimeters for rigidity, while for other parts, 2 perimeters are sufficient.


This link has a short film showing a UVEX box in progress.
A number of holes are tapped M3 and M4 (for example the holes for fixing the cover on the housing). This is a delicate operation that must be done with care. It is recommended to use the set of 3 taps in order for each diameter, and to push "rather firmly" before turning the tap holder carefully and without risking the material (only the M2 holes of the clear slit UV06 part are tapped by the screws themselves). It is necessary to push throughout the first tapping, taking care to stay as much as possible in the axis of the hole, otherwise the tap may slip. It is a good idea to train on a spare part for the first tapping.


4. THE ASSEMBLY
The first operation is to glue the slit ring UV03 in the space provided in the UV01 housing. It is necessary to use the correct orientation, aligning the markings drawn on the front of the pieces (it is inside this ring that the slit-holder proper will be mounted, which must be correctly oriented relative to the grating grooves):


The camera interface is then mounted (in the photos below, the ZWO camera model is shown). We use a set of M4 screws and nuts for fixing:

It recommended to then mount the telescope interface, which limits the risk of later contaminating the optical components through further handling after they are installed. The interface block used here is the Alpy 600 spectrograph guide block, which can be purchased from Shelyak Instruments. This high-quality piece of metal, which is essential for good observations, is however the most expensive part of the UVEX project. A study is under way to develop as an alternative a compact module for this function, which can be produced by 3D printing and which also includes the calibration elements (spectral calibration, white lamp) and the necessary electronics. Four M4 screws are used to mount the guide box:

The slit is mounted on its support UV04 (M3 screw). The following views show the use of a Shelyak slit (in this case the model that is screen printed in a chromium layer deposited on one side of a thin glass slide):


A clearance of approximately 1.0 mm must be left between the contact surfaces of the UV03 and UV04 parts (this distance may be adjusted when the instrument is tuned - see next section). Note again that an adjustment in rotation makes it possible to orient the long axis of the slit parallel to the grooves of the grating. The UV05 clamp is used to complete the fixing of the slit holder.

One option is to use a "clear" slit, also part of the Alpy kit that can be provided by Shelyak Instruments. It is actually a set of slits machined into a sheet of nickel 50 microns thick. They give you a choice of slit width and a 25 microns hole, which can be a very useful artificial star during bench testing. This slits system is more economical than the model on glass and more transparent, especially in the ultraviolet, but it is also more fragile and difficult to handle. The surface is sufficiently reflective and flat to achieve good telescope guiding. The clear slit fits on the intermediate inclined support UV06 (the graved face is turner toward the mechanic support):


The next step is to mount the cylindrical lens in the housing provided in the UV01 case. The convex side should be turned towards the inside of the case. It is very important that the installation plane of the lens is flat and well cleaned of 3D printing defects and burrs. The longitudinal position of this component is critical in relation to the other optical components (and no adjustment is provided here, the positioning is obtained by construction). It is not recommended to glue the lens to begin with. It is best to fix it with a quality tape, Kapton, which adheres well both on glass and on the plastic case.
The name "Kapton" is a trademark. It is a polyamide adhesive tape with remarkable mechanical, adhesive and chemical properties. It is often used in optics or to fix elements in environments as difficult as satellites. It's easy to find this tape from merchant sites like Amazon, hardware shops or electrical hobbyist outlets. You must be careful not to dirty the optical surface during handling (if this happens, clean the glass surface by rubbing with cotton moistened with water then dry, frequently changing the cotton):


It is now time to deal with mirrors M1 and M2. They are arranged in their respective mounts (tighten the side screw gently):


The mirrors in their frames are then fixed in the support parts UV09 and UV10 (embed the FMP1 frames fully in the supports in order to line up the correct height for the optical axis):


You are now ready to mount the mirrors in the UV01 case. Note the presence of pre-positioning marks. Their appearance here is shown with white paint, to make them clearly visible:

Left, the positioning of the supports for the optical components with respect to the markings on the case.


Each of the mirror brackets is mounted with a M4 through screw. The edges of the supports are best aligned at first with respect to the position marks of the housing. The supports are equipped with a link system for fine adjustment of the mirror orientation (UV11). These elements can be moved using a screw that pulls and pushes, controlled from outside the box after slightly loosening the screw fixing the mirrors. Below is a view of these adjustment devices on the external side of the box.

Details of fine orientation tuning system of M1 and M2 mirrors:


The last element to put in place is the diffraction grating in the UV12 support. Be careful to respect the direction of the arrow drawn by the manufacturer in relation to the support, as indicated in the photograph on the left below (the arrow gives the direction of the blaze). Also be careful to always hold the grating by the sides. Never touch the optical surface. Never rub it for cleaning. If there is dust, leave it, do not try to remove it. Tighten the M3 screw at the top of the UV12 support only quite gently (the use of a nylon screw is ideal, to avoid damaging the glass). Pass the axis of the grating support through the hole provided in the box, taking care not to put your fingers on its optical surface or that of other components - measure your gestures well. Align the support with respect to the mark drawn in the floor of UV01 (valid for a 300 lines/mm grating):


Fit the UV13 external orientation knob using the axial screw so that the rotation is relatively smooth and tighten the side screw so that the grating is well driven. During normal use of the spectrograph, you should turn this knob (slightly) to position the desired wavelength range on the sensor's sensitive surface.

All that remains is to close the UV01 box with the UV02 cover, then slide a camera almost completely into its place in the camera mount, and you have finished construction!
5. TUNING
Tuning the Czerny-Turner is not easy, in fact this is actually the greatest difficulty for anyone who wants to embark on the UVEX adventure. The problem lies in the off-axis use of the mirrors, the large number of degrees of freedom, and the co-dependence of the effects. To illustrate this last point, an alignment defect on the mirror M1 or on the mirror M2 can have similar effects. In this case, how do you find the correct mirror to adjust? Or, an angle error on the grating can be compensated by the orientation of the mirror M2. It is not easy to tell when the optics are well adjusted, because aberrations can appear out of the blue. That's the difficulty.
Do not be discouraged, because with patience we will always get it set up correctly, and finally we will be well rewarded. Here is a possible adjustment procedure...
The rule of thumb is to avoid as much as possible making settings on the telescope arranged on its mount and at night. You will exhaust yourself with little chance of a result! The correct procedure is to make all the adjustments on a table using your observing telescope (if it can be removed from its mount), or by using an auxiliary optical tube, such as a small telescope you can carry around. This bench setup is the basic work tool. Below, a 65mm f/6.5 telescope is used as the test medium, while the spectrograph will be used on a 250mm f/8 Richey-Chrétien. This difference in size is not a problem. For optimal tuning, however, it is preferable that the test telescope was much fasty as the observation telescope.
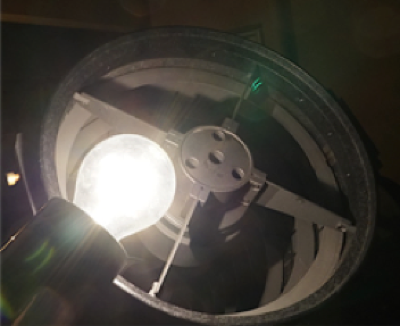
Another essential element for the tuning is the light source. By day you can use the light from the sky, or ambient light (a white wall...) which gives for free a beautiful Fraunhofer lines spectrum of a G2V type star. A compact fluorescent lamp is also a very good companion thanks to the presence of intense mercury lines in the ultraviolet (see an atlas of lines later). For red light, it is necessary to use a neon night light. In the image opposite, we have a red night light for a child's room in front of the objective of the telescope (not to be confused with LED sources, which emit no line)! If you find one of these lights in a store, buy it!

5.1. Post—tuning
The first precaution to be taken is of course to align the optical elements (M1, M2, the grating) by eye during the assembly with respect to the marks engraved in the floor of the case UV01. In this way, you should get a first spectrum on your sensor without further problems, which is a good start. But it is guaranteed not to be a very good spectrum. The orientation accuracy of the elements by eye is about 1 °, while we must achieve angle errors not exceeding 0.1 to 0.2 °.
It is recommended to use the 300 lines/mm grating to start the adjustments (the mark in the box is planned for this grating and so that the center of the visible spectrum falls in the middle of the detector when the spectrograph is well tuned, more precisely the wavelength 510-nm). You can also adjust with another grating, for example the 1200 lines/mm, but the mark will no longer be valid. For example, at the opposite, the characteristic orientation for the 1200 lines/mm grating.
Note that normally the grating change does not require a new adjustment of the entire spectrograph (mirrors M1 and M2). The operation is relatively simple: remove the UV12 support, change the grating, position the grating holder on the UVEX box, and finally, look for the orientation of the grating that makes the detector reach the part of the spectrum that we want to study. You can also decide to make a support for each diffraction grating at your disposal; it's even faster.


5.2. Focus the acquisition camera
The first spectrum recorded by the electronic camera will probably be very blurred because of poor focus. Move the camera backwards and forwards in the camera mount to make the spectrum more or less sharp (do not seek to refine it too much at this point, as the focus will be reset later after you adjust other elements of the equipment). Ideally, the camera should be able to slide with a gentle force. If it's too stiff, use an emery cloth on the inside of the camera mount. If the mount is too wide, attach metal tape around the body of the camera (aluminum sealing tape, try DIY stores). With practice, you will achieve a sensitivity of the order of 0.1 mm by hand adjustment. Note that a locking screw (with nut) is provided for in parts UV07 and UV08.
5.3. Orient the spectrum image
Next, try to align the dispersion direction and the the spectral lines with respect of the detector axis (the pixels grid). Considering the images below, the idea is to go from the top picture to the bottom picture (UVEX spectra made on a table in daylight):

Before.

After.
To achieve this, the camera must first be rotated in its housing in order to bring the dispersion axis parallel to the sensor lines (in the example, the presence of dust in the slit causes the accidental horizontal line, the "transversalium", but in this case it helps to orient the camera!). It is then necessary to adjust the orientation of the slit (rotation of the piece UV04 in the UV03 housing).
Its optical design means that UVEX produces a sharp spectrum only over a relatively small slit height. UVEX is specifically designed for observing point objects, like stars (but you can also realize the spectra of small nebulae, galaxy nuclei ...). A form of astigmatism occurs outside the sharp zone, which has the effect of widening the spectral lines and thus of losing spectral resolution. You can see this in the spectral image below:

... we are looking at the emission spectrum of a compact fluorescent lamp in blue. The spectrograph is correctly adjusted here, but it can be seen that the mercury lines become fuzzy at both ends of the monochromatic images of the slit. It's a form of astigmatism. As a result, this image is really exploitable only in its central part (between the two yellow lines). Note that this area of sharpness widens as you work with slower telescope optics: it’s larger with a telescope working at F/10 than with a telescope at F/5.
Another important point to emphasize is the centering of the area of sharpness, indicated in this figure by the vertical position of the red line. Depending on the machining quality of the UV12 support of the grating, or precision positioning angle, the sharp zone can be offset upwards or downwards (or even right out of the physical width of the slit in the worst situations!). In the event of a problem, remove the UV12 support (this operation is simple, just unscrew the two screws of the UV13 lever), try to modify the inclination of the grating (possibly add a shim of paper to fix the tilting), reassemble the support, and see if the situation improves (perfect centering of the sharp area is not strictly necessary).
5.4. Orient the M1 miroir
We now proceed to the adjustment of the mirror M1. It is here that the calm comfortable and warm bench setting makes the difference. A first approach to the adjustment is to orient the mirror M1 so that the optical beam is centered on the surface of the components that will follow (the grating, M2, the detector). For this, it is necessary to use a compact fluorescent lamp, which is successively brought to one edge, then the other, of the objective of the telescope while observing the spectrum, as in the illustrations below:


Note that the movement is on a horizontal plane. For the procedure to work it is necessary that the spectral dispersion plane is also horizontal, which involves orienting the spectrograph as shown below.

Understanding the purpose of this maneuver requires some optical principles. The following diagrams are ray tracings in UVEX belonging to an optical beam operating at F/6, with the length of the detector assumed to be about 12 mm (the grating is 300 lines/mm). First, here is the situation when the spectrograph is well tuned:


The entire the telescope pupil is illuminated. There is no optical vignetting (loss of rays over the optical edges of the components) . The rays, however, pass very close to the mechanical limits (note the red part of the spectrum that borders the edge of the grating when arriving at the detector). In practice, it is necessary to move the lamp in front of the pupil of the telescope during the exposure to obtain an approximately uniform illumination.
Here only the left edge of the telescope mirror is illuminated. The spectrum is less intense, but of course, the rays are conveyed without vignetting from one end to the other of the system. Note that the spectrum appears extremely sharp because the beam is very narrow, which greatly reduces the optical aberrations (note, this is stigmatic optics, the physics teacher can use this to introduce some nice concepts of optics, and the mathematics teacher a little applied formalism and geometry).
Now the rays come from the only right edge of the objective of the telescope, simply by moving the light source.
Now let's see what happens when an angle error affects the M1 mirror. In the simulation below this mirror was accidentally rotated by 1 ° (only), as indicated by the arrow:


Now the most extreme red part of the spectrum is vignetted by the mirror M2 and also cut off by the mechanical edge of the grating. For the observer, this corresponds to attenuation in intensity of the red side of the recorded spectrum. There is also a shift in the wavelength range ("green" rays no longer reach the center of the detector).
Illuminating the left side of the telescope pupil. The shift of the spectrum is always observed.
The case is then made more interesting by illuminating the right edge of the telescope mirror. This time the effect of vignetting is even more marked for the observer.
The natural reflex in this situation is to recenter the green part of the spectrum on the detector center by orient the grating :


Turning the grating as indicated by the arrow, to place the green part of the spectrum in the center of the detector makes everything seem fine...
By illuminating the left edge of the objective, again, we observe a fine spectrum and in the right place.
But the effect is spoiled when the right edge of the pupil is illuminated. This time, the end of the ray path goes past the edge of mirror M2, and in the image, the red part of the spectrum is abruptly cut off. This symptom is the sign of a misalignment, which we erroneously tried to compensate for by turning the grating, while the real problem is the mirror M1.
Your first task is therefore to balance the vignetting on the red and blue ends of the spectrum by adjusting the orientation of M1 and using the principle of "sub-pupil" lighting. This operation is valid if the other components are at their nominal position, which is not guaranteed. All of which means that it is then necessary to proceed by iteration, a process that requires being patient and methodical. We start here with the mirror M1 because it is more sensitive to defects.
After this first-order initial adjustment of M1, we have to work more finely by observing the inpulse response of the lines: the spot image when we illuminate the spectrograph input with a monochromatic point source (like a star that produces light only in one wavelength). An efficient way to produce a point source is to opt (possibly temporarily) for a clear slit Shelyak OP0073 or OP0092 that is mounted on the UV06 support (note, the engraved surface must be on the spectrograph side, not the telescope side, because of the presence of a chamfer). The slit system OP0073 is equipped with an isolated hole of 20 microns in diameter, the OP0092 system offers 3 aligned holes of 10, 15 and 20 microns:

Here is the view of the spectrum of this point when using a compact fluorescent lamp: each of the points corresponds to a monochromatic image of the hole for various wavelengths (UV part of the spectrum). The telescope is working at a focal ratio of F/5:

The goal is to get an image of the point as clean and symmetrical as possible (case A). Incorrect settings of M1 preferentially generate coma (case B in the figure above). It is then necessary to retouch M1 to arrive at the case A (this is adjusted to within a few tenths of a degree).
Case C corresponds to a defect of adjustment of both mirror M1 and mirror M2 (an error on the mirror tends to widen the spectrum trace). In case D, the camera is poorly focused.
When you do not have a source hole, you have to resign yourself to examining the spectral lines, but with a less accurate diagnosis…
In the example above, the 2D spectrum of the top image corresponds to a pretty good adjustment. In the spectrum below, the group of 3 lines on the left is sharp, but the lines on the right are fuzzy, with a characteristic asymmetry of the coma. Adjust M1 first to deal with this type of problem, while checking that the "vignetting" test has passed.

5.5. Orient the M2 mirror
If, when observing the source point or a star, you see the view of the spectrum below (variation of the width of the spectrum as a function of the wavelength):

… it is necessary to rotate the mirror M2 in the correct direction to reach the result:

5.6. Longitudinal setting of the entrance slit
- if when observing the source point you can not obtain both fine spectral lines and a narrow spectrum over its entire wavelength;
- if when observing a star with a telescope, the image of the slit is very sharp in the guide camera, as well as the image of the star (it appears punctual), but that the spectrum trace is hopelessly uniformly and unusually wide over its entire length (see the example below on a spectrum extract of the Arcturus star made with UVEX equipped with a network of 1200 lines / mm at the focus of a telescope opened at F / 10):

... it is likely that the planes of sharpness of the star image and focus of the cylindrical lens are not confused. This means that you can observe fine spectral details without getting a narrow spectrum, or vice versa, even when you try to focus as much as possible by moving the camera longitudinally. This is the symptom that the slit carried by the piece UV04 is not at the right distance from the mirror M1 (not respecting the 100 mm gap between the slit and M1 (see the "optical formula" section). In the part devoted to the assembly, I indicated that it was necessary to respect a distance of 1 mm approximately between the contact planes of the shoulder of UV03 and UV04.
If the anomaly of abnormally wide spectrum width appears (a spectrum wider than 15 pixels typically with 2.4 microns pixels for example), it is necessary to adjust this distance, then to redo the point of the spectrum, then finally, to note if the situation improves (in the example of the Arcturus spectrum above, the positioning error was of the order of 2 mm compared to the nominal, which means a gap slit-collimator distance of 98 mm to compare at the nominal value of 100 mm If the situation gets worse, it is necessary to move the slit longitudinally in the opposite direction.
In the opposite example, the slit support is moved so as to move the slit away from the mirror M1. In doing so, the focus point of the entire spectrograph is changed. You have to catch up by moving the camera as indicated by the arrow. This work is iterative and quite tedious because it will also at the end redo the point of the guide camera if it is already in place.

Here is the result on the image of the Arcturus spectrum as we converge towards the good result: fine lines + narrow spectrum.

5.7. Final control
The spectrograph is correctly adjusted when, after modifying the setting for the wavelength of the spectrum (rotating the grating), the spectral lines remain sharp, see at right.
But of course the final test is on a true stellar object: all is OK if in the same time the slit image, the guide image of the star and the spectrum of the star are sharp.


6. A SPECTRAL ATLAS
We have seen in previous sections the importance of having artificial sources of lines that produce a strong enough flux and that can be arranged facing the entrance of the telescope for adjustments. In routine use these same lamps can be used to calibrate scientific spectra in wavelength (illumination the full entrance of the telescope is best). It is recommended to have two types of inexpensive lamps: (1) a compact fluorescent lamp (but beware that legislation in Europe mean that these are disappearing, replaced by the calamitous LED lamp, but by looking hard we can still find them.), (2) a neon discharge lamp that can often be found from electrical control systems, for example.
Here are the wavelengths of the main lines that can be identified in the light produced by a compact fluorescent lamp (the fine lines come from a mercury vapor, the broad bands come from the rare earths terra deposited on the inner side of the glass bulb):


A line atlas of a neon lamp (Ne) :

For information, stellar Balmer lines, which are very useful for calibrating UVEX spectra in the ultraviolet:

7. EXPLOITATION OF UVEX SPECTRA
The way of optimally processing the UVEX spectra is a subject in its own right and will be the subject of other pages in the future. We suggest the reader should wait a little bit, knowing that there is already work to do if you want to make your copy of UVEX!
But while waiting, here is a set of characteristic spectra coming from this spectrograph, which give an idea of the possibilities. Note also the diversity of possible configurations. These data have a real scientific value and were acquired during the development phase of the UVEX project.


Symbiotic stars:


A sample of Be stars UV spectra:

UV and blue spectrum of P Cygni star (34 Cyg) taken by using a 1200 traits/mm grating and a narrow slit (14 microns). The spectral resolution is preferred here rather than the radiometric resolution. The telescope is relatively modest, a Celestron 8:

Moon spectrum (i.e. solar spectrum) near H&K Ca II lines:

Reflectance measure of Uranus planet:


Ratio URANUS / HD 20630
Part2: The UVEX processing