Digital camera image processing
Page (1/3)
For a quick illustrated tutorial about DSLR preprocessing, click here
This page describes tools of IRIS especially implemented for process images coming from digital cameras able to produce RAW format images. Click here for specific information about RAW format and more generally, of the modern digital cameras properties in astronomy .
If the digital camera produce JPEG or TIFF images, for maximum performances it is absolutely necessary to exploit RAW. There are at least three fundamental reasons which justifies this choice: (1) RAW image is not degraded by an irreversible compression like the JPEG, (2) the majority of the digital camera codes the RAW with 10, 12, or14 bits, whereas the standard JPEG and TIFF are limited to 8 bits of dynamics by colors planes, (3) the acquisition parameters are well fixed in RAW, from where guarantees to obtain reproducible results whereas for JPEG or TIFF the internal processor of the digital camera make obscure processing, making very problematic serious exploitation of the data.
Camera digital images does not escape to the traditional preprocess, like to powerful CCD camera. Even if the sensor of the digital camera is of CMOS type, it is the same ground as CCD detectors. Thus, any exploitation of the images is preceded by an preprocessing treatment sequence, in the order:
(1) subtract the offset signal (or bias). The reason is to fix true electrical zero of the useful signal, a precondition to all that will follow.
(2) subtract the thermal signal generated by materials defects constituting the sensor (impurities) and which is a function of the temperature. This thermal signal is obtained during distinct frame acquisition, by making long exposures whereas the sensor is in the total darkness. One calls sometimes the result, the dark exposures.
(3) correct the local no-uniformities responses, caused for example by an optical vignetting or by the presence of dust in optical path. For that the images to be treated are divided by images of uniform scenes, i.e. the flat-field.
They are these stages applied to the images coming from digital camera which are described in this page. We expose also registration and stacking problem. Lastly, one gives some notion on the specific processing of the colors images colors and some easy ways of use IRIS in this field.
Note: It is recommended to read the IRIS tutorial about image preprocessing. Click here for this.
Before any thing you must convert RAW images coming from the digital camera in an image format more directly exploitable with IRIS: either the proprietary PIC format, or the FITS, the standard for astronomy.
In version 4.0 it is however recommended to convert RAW images to the PIC format than FITS format FITS. This is due to a temporary limitation of the management of the FITS as soon as it is a question of storing true colors images.
IRIS V4.0 can also import and export file of type JPEG, BMP, TIF, PNG.
First of all configure IRIS as well as possible...
1. Configuration of IRIS
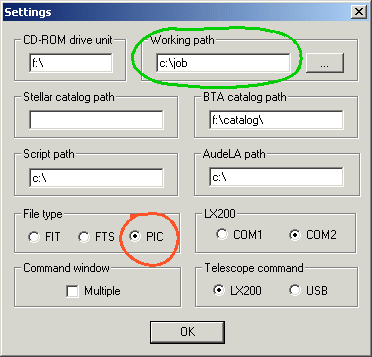
Open the dialog box Setting... since the File menu. Indicate the working directory in which you will store the images. In the example this directory was named job on the disc C: (it is an example). Select also the PIC format option.

Now click camera icon in the tool bar:

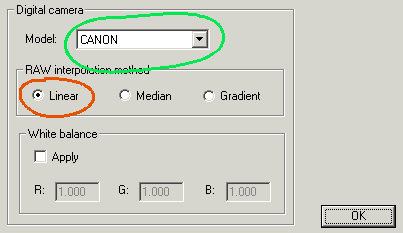
Select (for example) CANON from the popup menu for import directly RAW images coming from EOS D60, 10D or 300D (option NIKON permit to import D100 images, etc).
You must then choose the technique which IRIS will use to convert files RAW into images true colors. For that the software must interpolate information collected by close pixels covered either with red filters, green filters and blue filters. The operation is so called demosaicing. The result is an image where each color plan is coded on 16 bits (either 48 bits of information by pixel). The bilinear method for interpolation is fastest, but it is passable concerning spatial resolution (restitution of the finest details). However this method remains often viable in many situation because the resolution is degraded at least same value at the time of the registration of a sequence of images. The median method preserves the resolution, but applies a filter which degrades the natural aspect of the stars for deep-sky imagery. This technique is not recommended for the stars images. The gradient method preserves well the resolution. The calculating time is long, but it is the method which gives the best results for the details point of view, even if in deep sky imagery the stars are not free from artifact.
Below a detail in the blue layer of an image taken with an EOS 10D and Takahashi FSQ-106 refractor which give extremely fine stars, a little with the top of the normal for amateur instruments. One compares the three methods of interpolation (for visibility the scale of the sub-images are increased by factor two):
|
|
|
|
The same comparison is made on the green layer, which always is best of the three layers. The differences are less visible:
|
|
|
|
For the tests select the straight-line method which is most expeditious:
Warning! The digital images are large sized, therefore a powerful computer is imperative to reach the sufficient comfort of use of IRIS. A speed of the microprocessor higher than 1 Ghz is recommended. Over all, it is necessary to have of consequent RAM memory, a good base is 512 Mo at least.
2. How to directly examine the contents of a file RAW?
Select Load... option of command File menu and chooses photo type files. Goes in the directory containing your RAW images (it can also be a CompactFlash memory interfaced to the PC). Open a file in a usual way. In the example below one imports an image coming from an Canon digital camera (note the extension CRW):

The calculations carried out by the program are rather complex and heavy. First of all IRIS decodes RAW file to produce an image known as CFA (for Color Filter Array). Image CFA is a black and white image which shows the signal received by each pixels of the sensors. These pixels are covered with a mosaic of filters red, green and blue. For example, if the scene observed is uniformly red, only the pixels covered with a red filter will be illuminated, the green and blue pixels appearing very dark in CFA image. Here a typical CFA, called Bayer array, which gives the layout of the red, green and blue pixels (note that there are twice more green pixels than of red or blue pixels):

IRIS then converted image CFA by a process of interpolation into three distinct images representing the primary color components (red, green, blue) from the scene observed. The faithful restitution of the details in each color plan is a delicate operation which requires a significant computational time. Several algorithms are possible for that. That selected in the control panel of the camera at the preceding stage is very powerful (interpolation exploiting the gradients of the image).
The loading sequence is completed by the display of the true colors of the image.


In the image above (document Thierry Demange - Canon EOS 10D) one finds on the left the characteristic aspect of Color Filter Array and on the right the natural color image after CFA interpolation..
Note: for loading RAW image and diplay it you can also use console command LOADCAM. For example LOADCAM CRW_0012
3. Elementary management of true colors images
A significant innovation of IRIS V4.0 is to authorize save an load color images in a single files. Also, an indicator in bottom on the left of the main IRIS window informs you permanently if the current images is a true colors (48 bits = 3 x 16 bits):
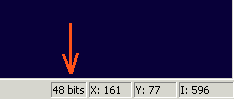
If the program indicates 16 bits, the in-memory image is a traditional black and white.
For store an image (color or grey level) use the Save... command of the File menu. For the presently version of IRIS (V4.0) the 48-bits storage is only supported by the proprietary PIC format (true colors FITS is planified for future version of IRIS):
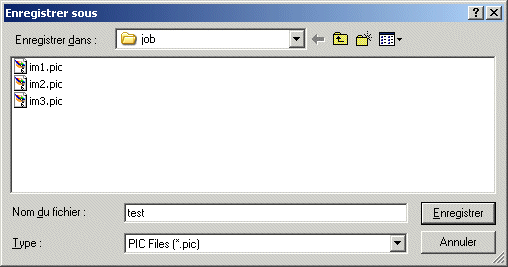
You can obtain the same result since the command console. Simply enter:
SAVE TEST
For load an image from the disk use for example:
LOAD TEST
Note: For display the command console click on the appropriate icon of tools bar (how to utilize the commands?... click here):
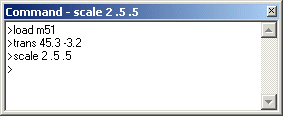
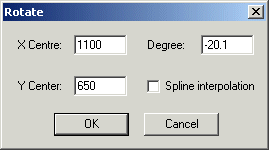
It is possible to realize some operation directly on the color image. For example, let us suppose that you want to make rotation of the current for an angle of -20.1 degrees with a centre of rotation located at the coordinates (1100, 650). Call the Rotate... command from the Geometry menu and enter parameters according to:
Here the aspect of the image befor and after the operation:


Note: You can recall the image aspect before the latest processing by clicking on the following button of the tools bar:

4. The white balance
So that the image appears natural, with neutral colors, without dominant hues, it is often necessary to adjust the white balance. This operation consists in applying a multiplicative coefficient to the three layers of RGB image so that a detail considered white of the image appear indeed white on the screen.
In the case of Canon EOS 10D/300D the green is the dominant color because the pixels of this color have a sensitivity notably stronger than the blue and red pixels. Look for example the aspect of the butterfly image just after loading:

In astronomical imagery, we will see it further, it is possible to satisfy of this type of defects throughout the major part of the preprocessing. It is generally only at the last stage which one deals adjust chromatic balance of the image to give a more or less natural tone.
4.1. Method 1: adjustment on a white part of the image
It is necessary to locate a white zone of the image, then the program calculate the chromatic contents at this place. It is sometimes a little arbitrary criterion. For example for a Saturn image one will use the rings, for an image of Mars, the polar cap, and for our butterfly... part of his eye which presents a quite white zone!
With the mouse define a rectangular zone which delimits a white region (drap the mouse while pressing simultaneously on the left button):

Then, from the command line window type the following simple command (there are no parameters):
WHITE
A new image is displayed almost immediately with a corrected chromatic balance. The program return also the value of the coefficients applied to all the pixels of each colors plans.
Note: other commands of this type are available in IRIS, in particular for the specific processing of the deep-sky images. We will study them later.
4.2. Method 2: interactive adjustment of the white balance
Run the White balance... command from View menu:
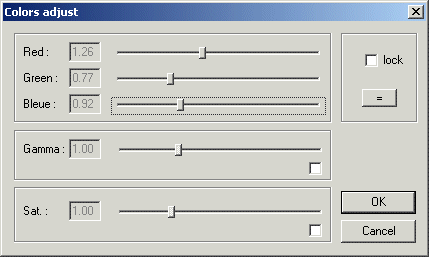
Adjust the relative position of the cursors Red, Green and Blue. The result is displayed after each action. In addition, this dialog box permit to adjust gamma as well the colors saturation.
4.3. Method 3: adjustment of the white balance during the loading of the image
During the loading of a RAW image the program can apply automatically, in a transparent way, a coefficient concerning all pixels of each plan so that the image is displayed directly with a good chromatic balance. You must as a preliminary define these coefficients. For that open the camera setting parameters dialog box (camera icon in the tool bar):
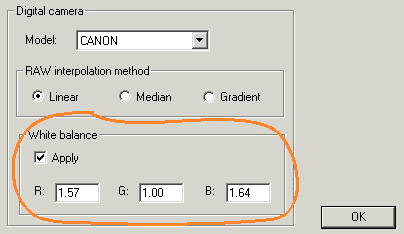
Select the option Apply to apply the white balance during the loading, then enter the value of the coefficients. Those for example are estimated by photographing a white screen on an image test, then by using the results returned by command WHITE.
For the continuation of this tutorial we do not use automatic white balance correction (uncheck Apply option).
5. Visualization of CFA image and extraction of the colors layers
Images CFA have a very particular texture and cannot be used just as for a scientific exploitation. But it can be useful in certain elementary phases to work directly image CFA. It is the the strategy used by IRIS for the preprocessing. At least for information purposes, you can visualize a CFA image by using command LOADCFA. It has only one parameter, which is the name of RAW file. The extension of file name RAW is added by IRIS and the if not path is specified the image is load from the working directory. For example:
LOADCFA CRW_0012
You can convert the in-memory CFA image into an image color by using the command CFA2RGB. lt is necessary to give 3 file names which will contain respectively the red, green and blue layers coded on 16 bits. For example
CFA2RGB R G B
produced in the working directory the files black and white file R, G and B and diplay the image colors displays.
Note: the command Convert CFA... of Digital photo menu permit also to display a color image on the screen but the RGB files are not produced.
The colors plans can be to examine and processed individually:
LOAD R
LOAD G
LOAD B
To reconstitute a true colors image starting from the three fundamental layers you can use command TRICHRO (or TR):
TR R G B
The same result can be obtained from a dialog box. Run command (L)RGB... of Visualization menu. Enter the following parameters, then click on Apply or OK :
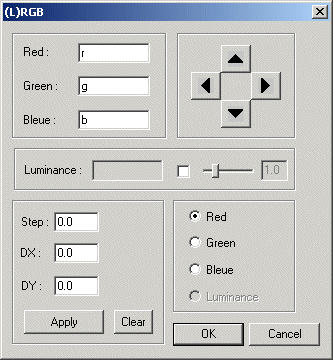
Note: The dialog (L)RGB can superimpose if necessary the colors planes near for fraction of pixels and perform LRGB technique (for more details on LRGB and colors processing in general click here: REF1, REF. 2, REF3).
RGB layers can also be extracted from the current 48-bits image by using a dialog box RGB separation... (Digital photo menu). You must simply indicate the names of the three files having to contain the information of the three primary colours. For example:
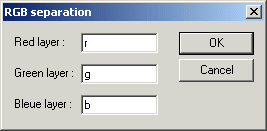
The in-line command is SAVE_TR. For example:
SAVE_TR R G B
The use of separate colors planes offers possibilities of fine adjustments. For example to produce the balance of the white you can write something like:
LOAD R
MULT 1.57
SAVE R
LOAD B
MULT 1.64
SAVE B
TR R G B
The commands 48-bits to 16-bits and 16-bits to 48-bits of Digital photo menu respectively make it possible to transform an image color into a black and white image (average of RGB layers) or to transform a black and white image into a color image (the B&W image is duplicated to constitute plan RGB). The equivalents console commands are TRI2MONO and MONO2TRI.
6. How to have information on the images ?
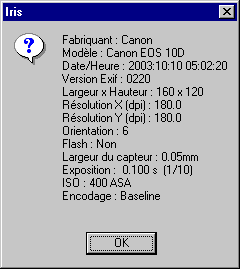
RAW Canon files is generally automatically accompanied by another files with the name but with extension THM. These file contain a reduced version in format JPEG of the RAW image plus the principal exposure parameters. These parameters are stored in the form of a standard structure, said EXIF. When you charge a RAW image RAW starting with Open... dialog, and if image THM is present, IRIS reads EXIF information automatically. You can display some information on the current image by calling the command Image info... of File menu:
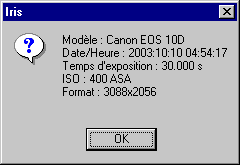
Note: you will obtain the same result by typing the command INFO.
You can visualize the content of a THM image (a quick-look of the RAW image):
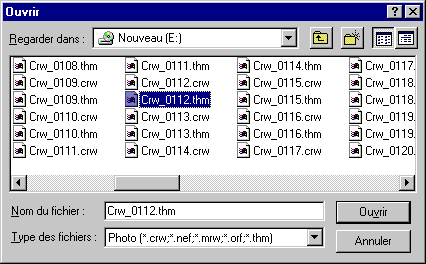
Try also the See Exif... command (Digital photo menu). This give the possibility to examine the contend of a specific EXIF:
Page (1/3)
|