Frame Acquisition with a Webcam
Since version 3.5, it is possible to control a USB Webcam camera with Iris.
First, go into the Webcam menu:
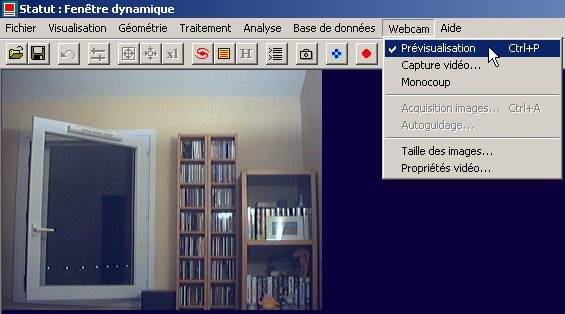
To visualize the image on line, select the Preview command.
If the image does not display correctly in the preview area, try to adjust camera parameters. Run the Video Property... command. from the Webcam menu. The dialog box corresponding to your model of webcam camera should then appear on the screen. The image below is the control panel that corresponds to the Philips ToUcam Pro webcam.
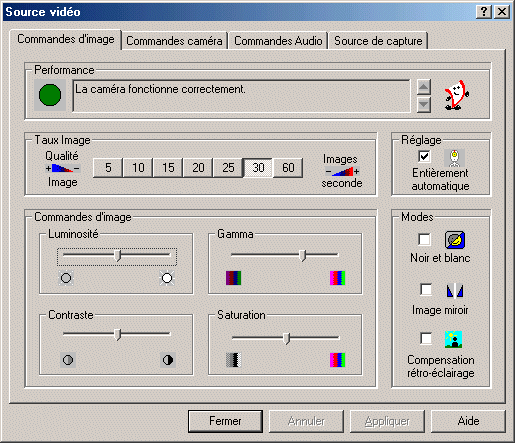
In the case of this particular camera, it is often enough just to use the automatic mode (at the top right) to solve visualization problems.
Note: if your webcam
is not recognized by Iris, it may be possible that you have a problem
of video channel definition. By default Iris uses channel 0 and
that cannot be to modify from the program. It is however possible
to change theis default parameter in the following way: (1) leave the Iris program (2) edit the file IRIS.INI which is located in the Windows directory (it is a text file), (3) change the value of the WebCamDriver parameter using a value from 1 to 10 (4) save the modification you have performed
and leave the text editor (5) run Iris and test again (6) start again at step 1 if problem persists.
Here now how to proceed to record an AVI film. You must first define the name of AVI file on your hard disk that will contain the film.
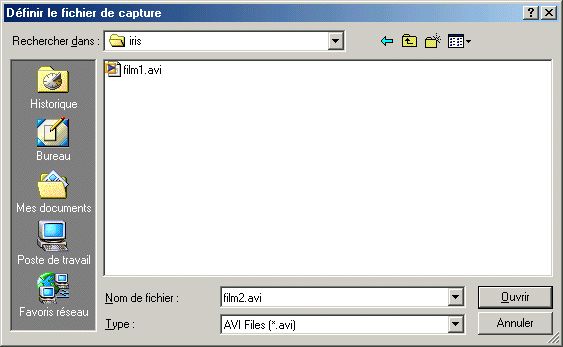
From the Webcam menu, run the Video file name... command. In the dialog box that show up, choose the directory and the name of the file. In the example below a file called FILM2.AVI is created in the directory IRIS of the C drive.
The simply run the command AVI acquisition setup... from the Webcam menu. In the new dialog box enter the number of images per second that must be acquired. The current discrete rate values are 5, 10, 15, 20 images per second. The parameter Duration allow you to specify the duration of recording in second (10 to 30 seconds is a good value).
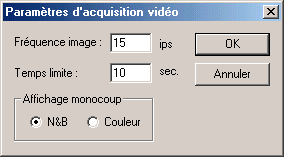
Do not consider at the moment the option One shot display.
Run the Video capture command from the Webcam menu.. After a confirmation message, the image is recorded on disk as time passes. You can stop acquisition before its normal end by pressing a key on your keyboard or a mouse button.
The Oneshot command allows you to acquire only one image, either black and white or color, according to the option selected in the AVI acquisition setup... dialog box. The image format can be adjusted using the Image size... command in the same Webcam menu.
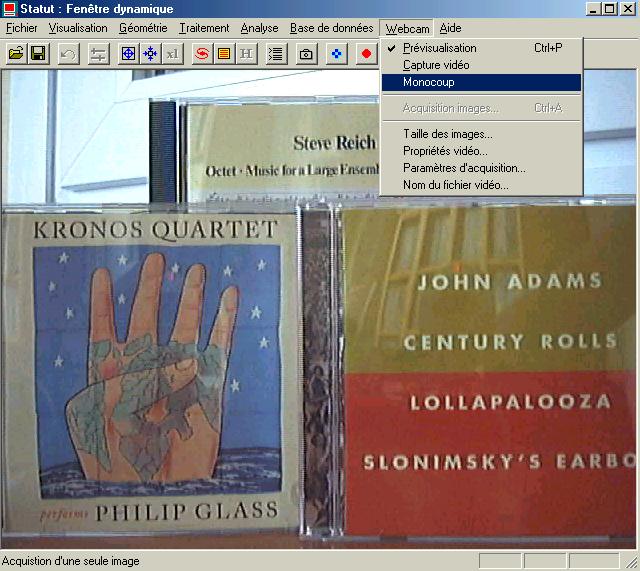
An important point must be emphasised: once the image is acquired, it is stored on your hard disk drive in a 16-bits format and can be processed with all the tools available in Iris. For example, you can choose to adjust the white balance:
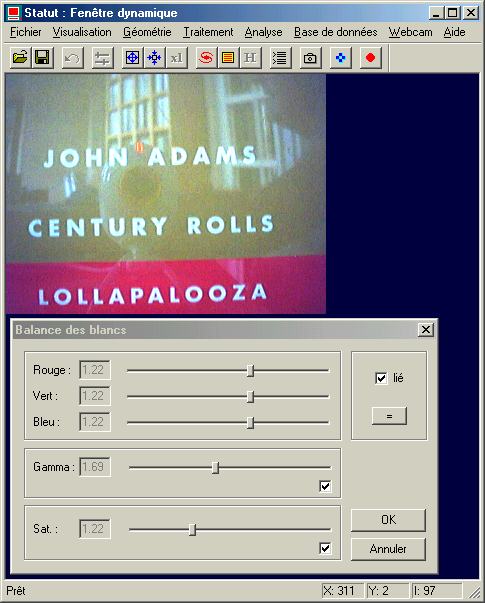
In order to save the image in a 24-bits format, you simply have to use the command SAVEBMP from the Iris console.
Iris has a specific Webcam acquisition mode that allows you to convert directly images from the video flow to a scientific format such as the FITS format. This feature multiplies the possibilities of your camera.
To stop the preview mode and enter the acquisition mode, just click again on this item in Webcam menu, then launch the Images acquisition... command:
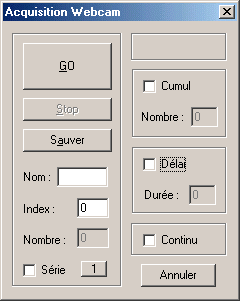
If you click immediately the GO button from the displayed dialog box, you obtain the same result as with the Oneshot command previously described.
Note: In order to display correctly an image you have just acquired, it may be necessary to adjust the visualization thresholds. Note that the image recorded by your webcam codes the pixel intensity only on 8 bits (corresponding to 256 levels of gray).
Note: It is well known in astronomy that handling color of celestial objects is a difficult topic, and this is even more true in the case of a webcam (planets are a notable exception). So it is advised to use as much as possible the black and white mode you can specify in the AVI acquisition setup... dialog box. You will save memory and image handling will be facilitated.
If you enter a file name, the acquired image will be saved in the current working directory using the specified file name. The image will be saved either in the FITS or PIC format according to the option specified in the setting dialog box (accessible through the command Settings... from the File menu). Simply click the Save button to save the image to disk. This operation can be repeated as many time as you wish.
You also have the possibility to acquire a full sequence of images. To do so, you can for example fill the dialog box in the following way:
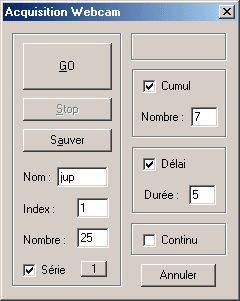
In this example, you are going to acquire 25 images using the same generic name JUP. As a result, 25 files named JUP1, JUP2, ...., JUP25 will be produced in the current working directory. Actually, each image saved on disk is the combination of 7 images acquired in a short time. A delay of 5 seconds between the 25 images of the sequence is also specified in the dialog box. The acquisition process starts when clicking the GO button. The process can be stopped at any time by clicking the Stop button. The button with the label1 allows you to set the index to 1 in an easy manner.
The possibility offered by Iris to combine several images together right at acquisition time increases the detectivity of the webcam which traditionally have a lack of sensitivity compared to specialized CCD astronomical cameras.
The possibility to specify a delay between each recorded image is a convenient way to avoid recording too many images on your hard disk when you want to perform observations during a significant amount of time, e.g. imagery of solar protuberances. Another usage of this feature is the periodic error measurement of a telescope mounting (see command TRACK).
The continuous mode will be described more in depth further in this page.
When the image acquisition process is running, it is possible to activate the Preview command from the Webcam menu and also to adjust the setup of the camera. Both 16 bits images acquisition and preview can be used concurrently (this is especially interesting to watch the seeing conditions).
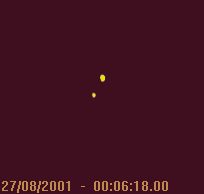
The image above shows the double star SAO10937 observed with a Celestron 8 telescope as well as a Philips ToUcam Pro webcam in a 16 bits acquisition mode. The objective in that particular case was to prepare an occultation of a star at magnitude 7 by the Titania, a Uranus' satellite on September the 8th, 2001 (note the possibility to get the acquisition date in the image - see further for details).
Trick: In order to check the accuracy of the dating process for the acquired images, a technique consists in observing a digital watch. This is extremely important for occultation events.

In the example above one can note a significant difference between the time registered in the header image and the time displayed on the watch.
In order to display the date in the current image, simply type the command WDATE from the console or press the combination of keys Ctrl+F8 after having clicked in the display window. This feature represents an easy way to measure the drift of the PC internal clock.
The Continuous mode of the Image Acquisition dialog box allows you to acquire images in a continuous manner and to display them on the screen just after they are acquired. Moreover, a reticule is displayed on the image and the position of the most brilliant star in the field is marked by a small cross. At the bottom of the image you can see the current date and the accurate position of the star in pixels. All this information is updated on a regular basis (the rate can typically be around 5 images per second with a 320x240 pixels image size).
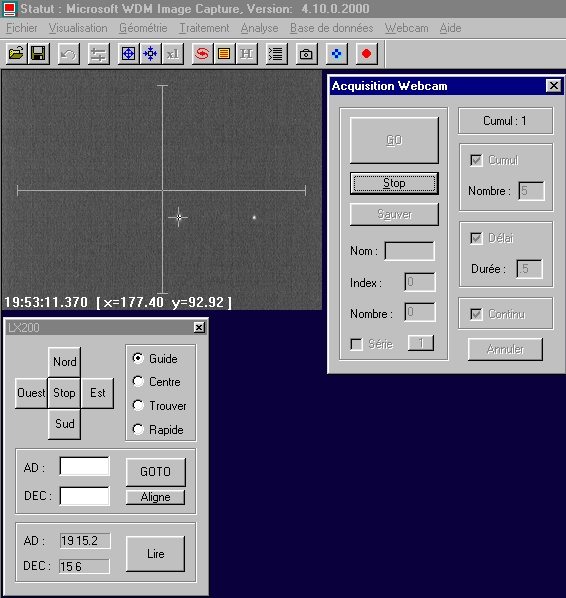
The Continuous mode is very convenient to precisely position an object on the surface of the CCD chip (note that you can also use the Preview command... from the Webcam menu). The main interest of the Continuous mode resides in the possibility it offers to analysis the tracking quality of a telescope. It can be used for instance to evaluate a PEC system (Periodic Error Correction). One finds PEC systems on equipment such as the Meade LX200 or Vixen SkySensor 2000. Note, as displayed in the screen shot above, that you have the possibility to display the LX200 control panel while performing acquisition (simply click the blue cross button in the toolbar). The continuous mode automatically generates two files in the current working directory (DX.DAT and DY.DAT). These two files contain the value of the drift (in pixels) according to time (in seconds) along the two axes of the CCD chip.
Note: If the LX200 system to be controlled does not answer, check first the wiring to the telescope. If it does not solve the problem, check that you have selected the correct serial port (see the Setup... command... from the File menu).
It is possible to automate the PEC evaluation from Iris. In order to achieve that, open the Autoguiding dialog box (from the Webcam menu). The following dialog box is then displayed:
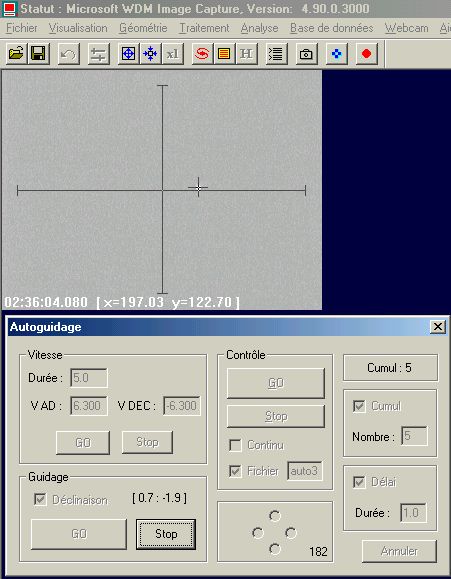
This dialog box is quite similar to the Acquisition dialog box, but it is not possible to save images from the Autoguiding dialog box.
There are two different ways to use the Autoguiding dialog box: (1) it can be used to monitor the PEC mode of a telescope mounting, (2) it can be used to adjust tracking speed during an acquisition session (in that case, one needs to have an LX200 compatible telescope).
The first operation to be performed is to calibrate the right ascension and declination speeds of the telescope mount. The information returned is the tracking speed on the two axis according to time (V RA and V DEC). It is expressed in pixels/sec with the slowest speed available on the system. The Duration parameter is the spent time when pushing (electronically) a button of the hand controller. This time corresponds roughly to the movement of a star on one third of the CCD length when using the tracking speed. Center star in the CCD then click GO (in the Velocity section of the dialog box). First, Iris will automatically move the star according to the horizontal axis (which is supposed to be the right ascensions axis) then the vertical axis (declination axis). Finally, the star is brought back to its initial position. The fields V RA and V DEC are then calculated by displayed. They are constants for your installation, and you will use always the same values.
To start guiding, click onto the GO button in the Guiding section. The difference in pixels compared to the initial position of the star is indicated as well as the value of the brightest pixel in the image (Iris tolerates temporary cloudy skies during the guiding process).
In order to perform a good guiding, first launch the Iris autoguiding function, then launch the procedure to record the hand controller movement of your system. The observation time of a star will be at least 10 minutes with a SkySensor 2000 and 8 minutes with a Meade LX200. The star must be located close to he celestial equator. It is possible to guide without too many difficulties on stars as weak as magnitude 8.5 with a webcam and a 200 mm telescope.

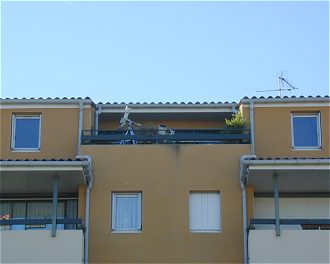
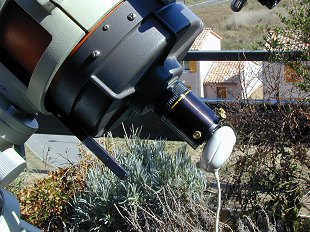
The pictures above show the configuration used to develop and test the Iris autoguiding functions: an old C8 at F/D=10, a GD-DX mount, a SkySensor 2000 PC unit and a Philips ToUcam webcam.
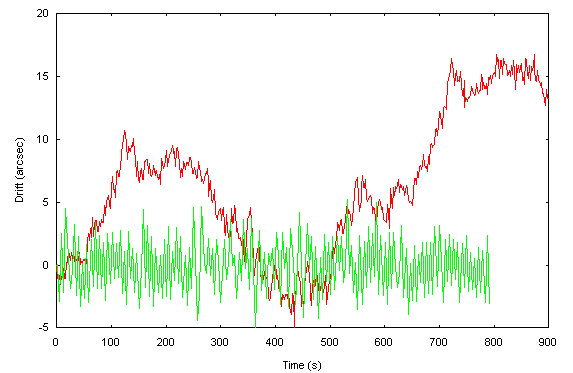
Above in red, the periodic error of the GP-DX mount. The periodic error almost reaches 15 seconds of arc as a total amplitude. One notes also a polar alignment problem. It is difficult to make exposures of more than 1 minutes in such conditions. In green, the result of the autoguiding with the webcam. RMS error is about 3 arc-seconds now. To obtain these curves it is necessary to select the file option and to enter the name of a file. Iris will actually produce two files by respectively adding two digits (X and Y) to the base name. It also uses the extension DAT for these files. These files are saved in the current working directory.
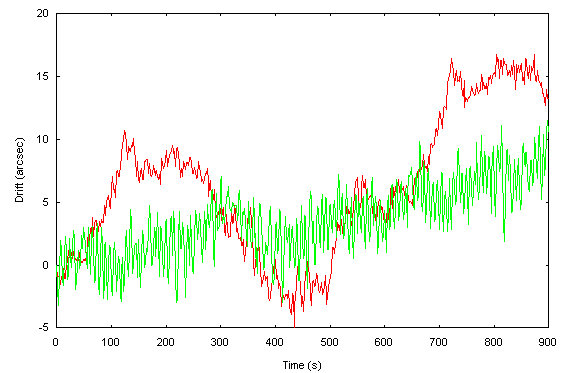
Above, in red the gross periodic error of the GP-DX mount. In green, the GP-DX mount is controlled by the PEC of a SkySensor 2000. The PEC learning was performed with Iris . The periodic error disappears (but not the effect of the polar alignment problem). The learning procedure is very easy : the operation does not require particular efforts from the operator, except temporarily installing a webcam on the telescope. Clearly, a webcam has become an essential tool for the amateur astronomer.


