New features of version 5.10

(click here for download the latest version)
Version 5.10 - September 24, 2005
Support of 48bits TIFF and PNG graphics format for saving and loading. Add of the commands LOADPNG, SAVEPNG, LOADTIFF, SAVETIFF.
Bug fixed in COREGISTER family commands for large images (see also Register stellar images... command of Processing menu). COMPOSIT/COMPOSIT2 normalize bug corrected. MIN_MAX combining improved (see Processing menu, Add a sequence... command). PADDING command support now true colors images.
NEW COMMANDS
LOADPNG [NAME]
Load a PNG graphics image file. 48 bits images can be loaded (3 x 16 bits). You can also use Load... command of the File menu.
SAVEPNG [NAME]
Save the in-memory image in a 48 bits PNG file. You can also use Save... command of the File menu.
LOADTIFF [NAME]
Load a TIFF graphics image file. 48 bits images can be loaded (3 x 16 bits). You can also use Load... command of the File menu.
SAVETIFF [NAME]
Save the in-memory image in a 48 bits TIFF file. You can also use Save... command of the File menu.
SPLIT_RGB [ R ] [ G ] [ B ]
Transform the 48 bits image in memory (true colors) into R, G and B separate component files (equivalent to RGB separation... command of Digital photo menu).
For example, try these symmetric commands:
SPLIT R G B
TRICHRO R G B
SPLIT_RGB2 [ IN ] [R ] [ G ] [ B
] [ NUMBER ]
Transform a sequence of [number]
true colors images in respective R, G, B files. See SPLIT_RGB.
SUBGRADIENT [ MARK NAME ]
Equivalent of SUBSKY but using the mask feature (see gradient removal procedure). The SETSUBSKY command can be used for the tuning (see also Gradient removal... command / Processing menu). The options high, medium and low background detection correspond respectively to "Sigma" values 6.0, 3.0, 1.5. High, medium and low fit precision correspond respectively to "Degree" values 7, 3, 2. For example for high detectivity and medium fit, before running SUBGRADIENT enter SETSUBSKY 6 3. All intermediate values are possible.
Misc.
Gamma
function (see new features of V5.00) can now process negative pixel values.
The date and the integration time are now stored in the header files after DSLR
acquisition. Bug corrected in the real time bias subtraction in image by image acquisition
functions of the Video menu (V4.35).
Bug fixed in automatic preprocessing function of RAW images (Digital photo
menu).
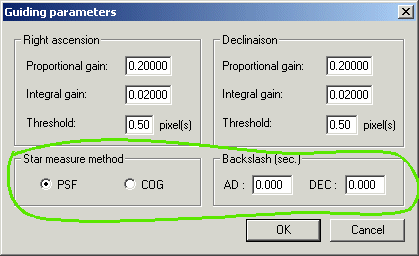
Two methods can be used for estimate star position during autoguiding (Video menu). The first one use a standard fitting of the star PSF. The second use a Center of Gravity method (COG) more adapted for guiding a star at the entrance of a slit spectrograph for example. The backslash correction (in second for the guiding speed) is also added.
Version 5.00 - September 14, 2005
EXECUTION OF SCRIPTS
Version 5.00 implements the possibility to run a succession of commands from a script file in text format. This script file (or batch file) must mandatory have the extension "pgm", for example "myprogram.pgm". Scripts is running with RUN command from the console.
The "batch" mode is very elementary. The execution is strictly linear. It is not possible to carry out conditional tests or loops for examples. The script is thus not a true program, but the process can be of a certain help for repetitive tasks
The minimal parameter of RUN command is the name of the batch file (no extension). If no path precedes the file name, Iris search the file into the working directory.
The name of the file can be followed by optional parameters which are provided to the script file. It is possible to pass up to 5 parameters by this method. In the script file the first agument is identified by the item "$1", the second parameter by the item "$2", and so on.
For example, a script file which produces an effect of gradient ("bas-relief") in an image with a variable force can be writen
load $1
trans $2 $3
save tmp
load $1
sub
tmp 0
visu 200 -200
Edit the file with a word processing software, and save the result under the name test.pgm in the working directory.
From the console, enter the command
> RUN TEST M51 1 1
The script which is executed is then equivalent to the typing:
load m51
trans 1 1
save tmp
load m51
sub
tmp 0
visu 200 -200
You can easily start again the batch by positioning cursor prompt on the command line and by modifying one or more parameters. For example
> RUN M51 TEST 2 0
The hundreds of Iris command can be used in a script "pgm" file:
load $1
scale 3 $2
$2
mirrorxy
...
Some commands require to define an area on the current displayed images. Just before this command, add in the script file the command PROMPT. PROMPT freeze the execution of the batch file and open a "Prompt" dialog box. Select the area of the image, then, click the "OK" button of prompt dialog box. For example
load m51
prompt
window3 200
In this example, during prompt, define a rectangle with the mouse. Iris crop a 200x200 pixels zone of the images M51 centered on the selected area.
PROMPT command is also useful for step-to-step run of the script.
You can also add comment into the script file. If the first word of a sentence is not a valid command, the corresponding line is a comment line. For example
==========================
My program load
Messier 51
==========================
load m51
End of my program
REMOTE CONTROL OF CANON EOS DIGITAL CAMERAS
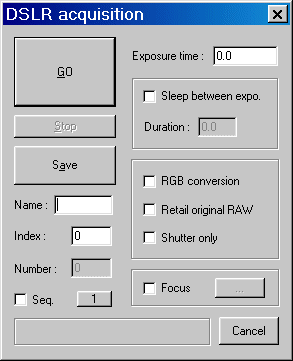
The digital cameras Canon EOS (10D, 300D, 350D, 20D, 20Da...) can be controlled by Iris to grab image via Acquisition... dialog box of Digital photo menu:
The control is carried out through USB interface (nominally an USB2 interface for efficiency reasons). The figure hereafter gives synoptic of the configuration:
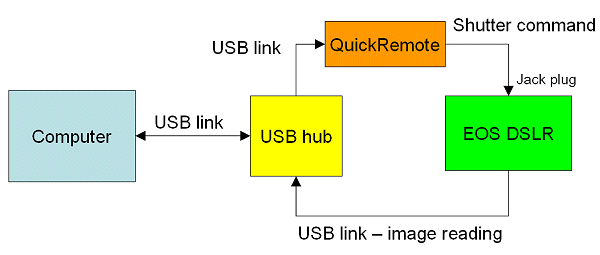
The QuickRemote interface is a low cost device used to open or close the Digital SLR shutter through the dedicated connector. The shutter command is sent to the QuickRemote interface through USB link. If the DSLR is adjusted on the "Bulb" position, Iris controls the time of opening of the shutter and thus the exposure time.
QuickRemote
is available from:
Essentiel Electronique
3 rue Montmorency
31200
Toulouse - France
Web : http://www.essentielelectronique.com
Email
: raymond@essentielelectronique.com
For a technical description of QuickRemote, click here.
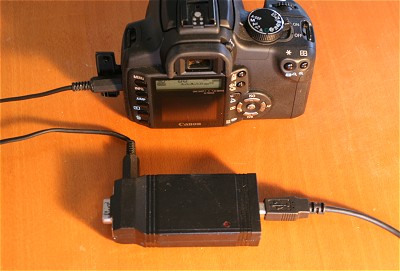
QuickRemote
interface. A 8-bits output port is also available for future applications
(autoguiding for example).
At the end of the exposure time, the EOS stores the image into the CompactFlash, then automatically, the last image thus safeguarded in this memory is read by Iris using the dedicated USB link between the DSLR and the computer. The image can be JPEG or RAW type, function of the setup of the digital camera.
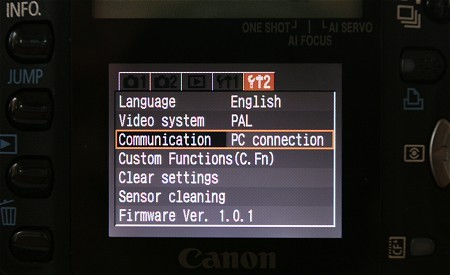
To be able to control the DSLR you must have the QuickRemote interface. You must also have to install the drivers of your camera (installation CD provided with your DSLR). It is important to select the option "PC connection" in the EOS menu, as on the image hereafter:
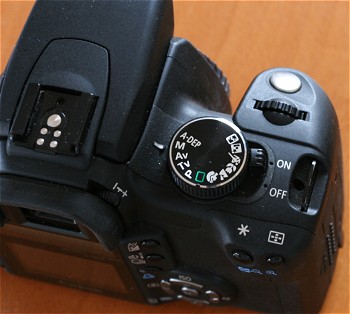
For an optimal operation, select "Manual operation", and if you use photographic lenses, disconnect the autofocus mode:
Note: In some situation, for a correct reading of last image stored in the CompactFlash, it is necessary to erase the card content before.
The implementation of EOS remote control into Iris 5.0 is experimental, but really fully operational and poweful in this prototype form !
Example. Select RAW mode (or RAW+L) and Bulb shutter speed. You can also use "EOS Capture" application to carry out these adjustments.
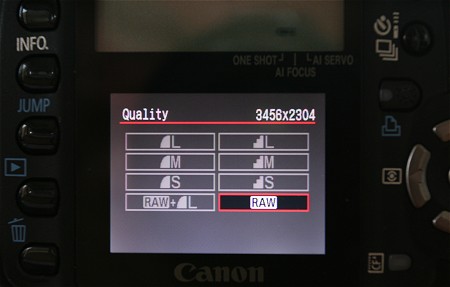
In the dialog box of Acquisition... choose an exposure time of one second (for example), then click on GO. After a few moment, an image RAW is displayed on the computer screen. You can save this image in your hard-disk and process it in an usual way (click here for example).
By choosing the option "Conversion RGB", RAW image is automatically converted into an true colors image (48-bits format).
If you select "Retail original RAW", not only Iris display the RAW image, but also store automatically in the working directory a copy of the image acquired in the CompactFlash (the name is identical).
The option "Shutter only" command the shutter and the current image acquired is stored in the CompactFlash only.
The possibility exist to acquire sequences of images in an automatic way. For example
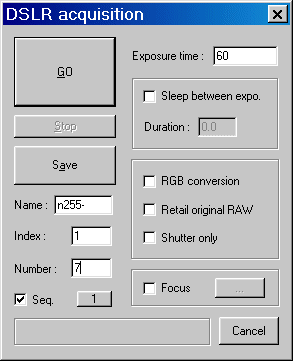
This setting takes 7 x 60 seconds acquisition, saved under the names n255-1, n255-2..., n255-7 on your hard-disk.
A delay can be programmed between two successives acquisition, for example to follow an event slowly variable.
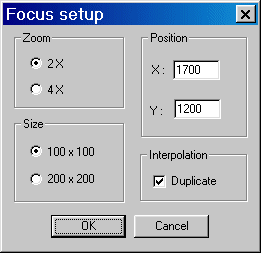
Lastly, the "Focus" option permit to acquire an enlarged crop of the DSLR original image. To choose the crop zone, define for example a rectangular area with the mouse in full a format image already displayed (for example around a star). The crop is centered on the selected zone. Then click the button '...' located left the "focus" selector button. In the new dialog boxes select the parameters of the focus acquisition (enlargement, crop size,...):
NEW COMMANDS
ACQ_DSLR [ EXPOSURE ]
Take an image with a Canon EOS serie Digital SLR. The exposure time is given in seconds. The result of the exposure is loaded and displayed. See also GET_DSLR command and Acquisition command of Digital photo menu.
CDG
Return the coordinates of the centre of gravity in the zone selected with the mouse.
ERASE
Clean the information located inside a selection box. An interpolation of the central zone is carried out by using pixels located on the periphery. The texture of the erased area is preserved for a neutral rendering. This command can be used for example to erase residual dust umbra in the image.
|
|
|
Left, an image affected by the presence of dust in the optical path. Middle, selection of dust zones. Right, the result after sucessives run of ERASE command.
FFTD2 [ IN ] [ MODULE ] [ PHASE] [ NUMBER ]
Calculate the direct Fourier transform of a sequence of images.
FFTI2 [ IN ] [ MODULE ] [ PHASE ] [ NUMBER ]
Calculate the inverse Fourier transform of a sequence of images.
FILE_COREGISTER [ IN ] [ OUT ] [ NUMBER ]
After the execution of a COREGISTER2 command (registration of a sequence of image by simultaneously using geometrical transformations like translation, rotation and scaling), it is now possible to start again a registration with FILE_COREGISTER which use parameters of transformation already calculated with COREGISTER2.
For example:
COREGISTER2 A B 5
register the sequence A1..., A5 by producing the B1 sequence...., B5.
So, then you type
FILE_COREGISTER A C
the C1 sequence..., C5 is strictly identical to B1..., B5, but the result is obtained considerably more quickly because the transformations are not recomputed. FILE_COREGISTER can also be used to register very large images after having calculated the parameters of registration in a cropped part of those. See also commands FILE_TRANS and FILE_ROT, equivalent for the a translation and a simple rotation.
GAMMA [ coefR ] [ coefG ] [ coefB ]
Apply a transformation to the level of RGB layers of a true color images according to a power function (correction known as "gamma"). If the image in memory is 16 bits image (N&B), it is converted into an image 48 bits. The levels of a given layer are accentuated if the corresponding coefficient has a great value. The characteristic excursion of the coefficents lies between 0,1 and 5. See also the command Gamma adjustement... of Visu menu.
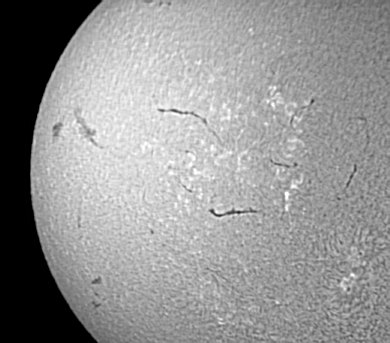
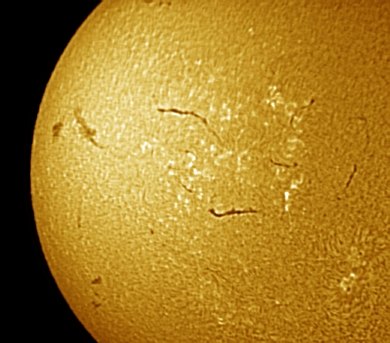
Left,
16 bits images of the solar chromosphere (image acquired by V. Desnoux with a PST
Coronado). Right, image after applied GAMMA
1.4 0.7 0.2
GET_DSLR
Load the latest image stored in a Digital DSLR CompactFlash (Canon EOS compatible). See also ACQ_DSLR command.
GREY_FLAT (or EQUALIZE_CFA)
Equalize the median intensity of RGB layers in a CFA images (valuable only for RAW file of DSLR of course). This command is improved in Iris V5.0. Notice, if the processed image is a flat-field, it is important to remove the offset signal (and dark signal if necessary) before.


Left,
typical CFA flat-field before RGB pixels equalization. Right, the same image
after equalization. The median level of RGB pixel is now identical.
L_OPT2 [ IN ] [ OUT] [ NUMBER ]
Compute an optimized binning on a sequence of 2D spectra. See L_OPT.
L_POSY
Return the vertical poistion of a 2D spectrum.
L_REGISTERY [ IN ] [ OUT ] [ NUMBER ]
Registration of a sequence of 2D spectra along the space axis only (vertical axis).
L_REGISTER3 [ IN ] [ OUT ] [ NUMBER ]
Registration of a sequence of 1D spectra along the spectral axis only, by using the intercorrelation method.
MERGE_CFA [ C1 ] [ C2 ] [ C3 ] [ C4 ]
Recombine a single CFA image separated with SPLIT_CFA command. See SPLIT_CFA.
RGBBALANCE [ Rcoef ] [ Gcoef ] [ Bcoef ]
Multiplied components red, green and blue of the 48 bits in memory image respectively by the coefficient Rcoef, Gcoef and Bcoef. This function is equivalent to RGB balances... command of Digital Photo menu.
RGBBALANCE2 [ IN ] [ OUT ] [ Rcoef ] [ Gcoef ] [ Bcoef ] [ NUMBER ]
Same function as RGBBALANCE, but applied to a sequence of
images.
RUN [SCRIPT FILE]
[...] [...]
Run a script file. Optional parameters are possibles. Click here for details.
STAT2 [ X1 ] [ Y1 ] [ X2 ] [ Y2 ]
Calculate the local statistics of an image. The coordinates of the calculation area are delimited by (x1, y1)-(x2, y2).
STAT3 [ NAME ] [ NUMBER ]
Calculate global statistics of a sequence of images. The result is a text file named "STATS.LST" in the working directory with 6 columns. Column 1: name of the image, Column 2: mean intensity. Column 3: maximum intensity. Column 4: minimal intensity. Column 5: standard deviation. Column 6: median intensity.
STAT4 [ NAME ] [ X1 ] [ X2 ] [ Y1 ] [ Y2 ] [ NUMBER ]
Same function as STAT3, but applying to a part of the images.
SPLIT_CFA [ C1 ] [ C2 ] [ C3 ] [ C4 ]
This function concern only RAW images of digital camera (DSLR). The command split the CFA structure into four distincts files (one for each of the colors/positions in the periodic Bayer matrix). One image contain the intensity of red pixels, two images contains the intensity of green pixels, and one image contain the intensity of bleue pixels.These four images can be processed individually, then recombined in a new single image CFA with MERGE_CFA command.
Crop
of a typical CFA image (Canon EOS350D). Note the typical Bayer matrix structure.
|
|
|
|
|
|
Result of the split of CFA structure. The image size is reduced by a factor two after SPLIT_CFA command. From left to right and top to down, green component 1, bleue component, red component, green component 2.
The
true colors image (for comparison and reduced by a factor two for clarity).
COSMETIC CORRECTION OF THE
COLOR IMAGES
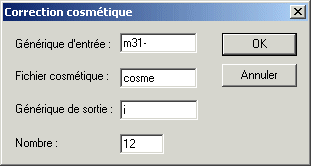
Addition of the possibility of carrying out the cosmetic correction of a sequence of images with a cosmetic file (Digital Photo -> Cosmetic correction...). This possibility already exists in the Preprocessing command, but in both cases, it was improved. Dark correction is also improved in V5.0 (optimization for minimal residual noise).
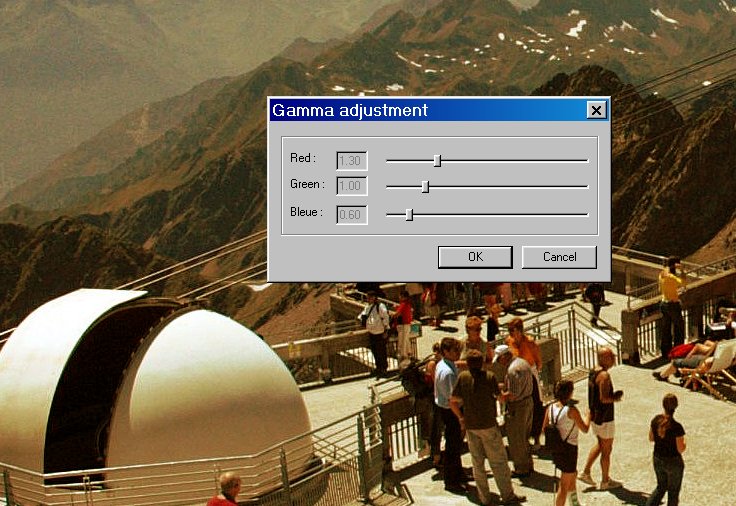
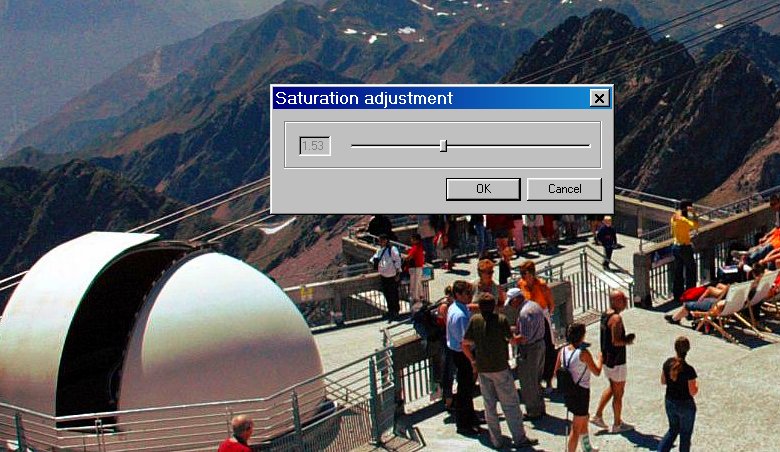
WHITE BALANCE, GAMMA AND SATURATION
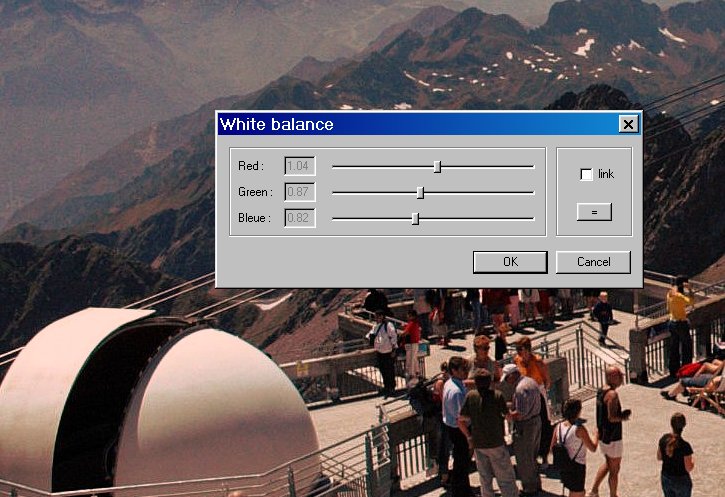
The Visu menu contain now separate and powerful function for adjust white balance, gamma curves and saturation of color images (48 bits).
STRETCHING
The interface of command Stretching... (menu Visu ) is modified (better interactivity) :

The inline equivalent command is STRETCH.
NEW SPECTRO MENU
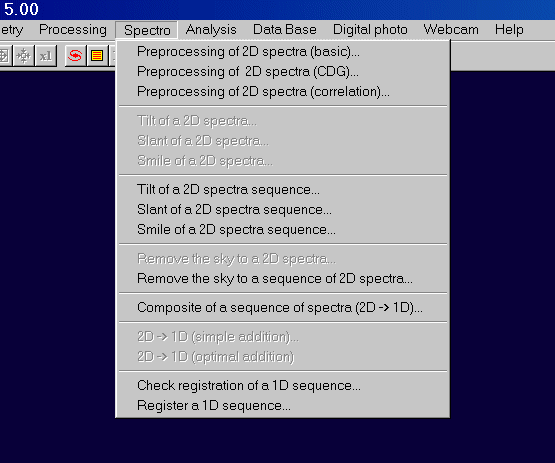
Le new Spectro menu contains specific spectrographic processing functions. Click here for download a complete tutorial in PDF form (file tutorial_spectro.pdf - size 1.2 Mo - in french, but many illustration). Demonstration spectra: nuit040805.zip (3.5 Mo) - nuit050805.zip (2.2 Mo).
MISC.
IRIS V5.0 support now the Nikon D2X raw format. SUBSKY2 and COMPOSIT command are now true-colors images compatibles.